The alternator normally does not require any attention during the major service other than an inspection and the belt change. In my case, I had two items that I had been “saving” to address while the engine was out
The first was to address a repair I made shortly after purchasing the car. The section of wiring loom that runs to the alternator connector ( with the wires for S, IG, and L ) had some very minor heat damage. It actually took me a few months to notice that the alternator warning light on the dash was not coming on when the key was in the ignition without the engine running. As I had been driving for several months, it obvious wasn’t a “real” problem but nevertheless wanted to get it fully sorted. I presumed that the bulb had burned out, but upon removal of the dash pod, I found that the bulb was just fine. More troubleshooting revealed that the L (Lamp) and IG (Ignition) wires were slightly stuck together and the insulation had in fact melted, and shorted to one another. Luckily this only meant that both terminals of the dashboard light were at 12V so it never illuminated. I did the repair as best I could at the time, but left myself a mental reminder to clean it up when the engine was out of the car.
I replaced the repaired sections of wire, and additionally added a heat sleeve on the final section of wiring harness that makes the 180 degree bend right under the DX exhaust manifold, which was exactly where the wires melted together. I think the solution looks quite good, and indeed should do a better job of protecting the wires in this hot location. The outside diameter of the fire sleeve fits perfectly into the back of the plug connector on the alternator, as if it was meant to be there in the first place. I also replaced the cushions on the P-Clamps to silicone ones (you can see the orange one in the photo below). I only did this for the two running to the alternator as the original black ones were very brittle - indicating that they do see some heat in this area. The rest of the P-Clamps were replaced with black rubber (as original)

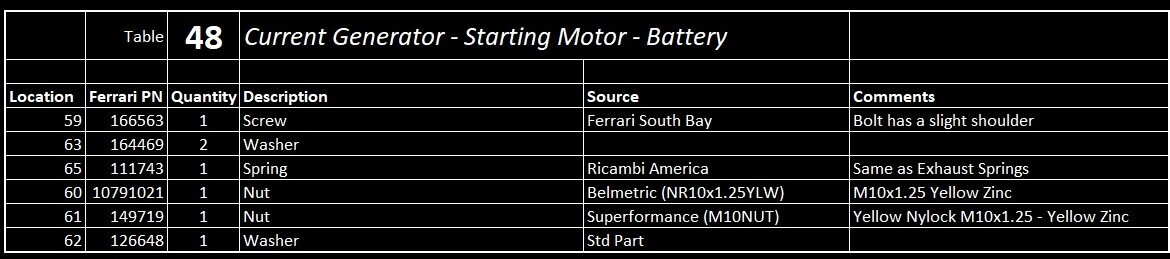
The second modification was to “upgrade” the lower mounting screw on the alternator. On table 48, you can see that there were a few iterations of the solution. The “Old Solution” (which is what I had on my car) was simply a bolt, two washers and a nut. The second solution (valid to engine 40158) looks like a shouldered bolt with some siamesed nuts and a couple of washers. The final solution was the addition of a spring with 2 washers and the two nuts on the end for fixation. Ferrari seemed to have spent some time and effort on this - but why? Well, while doing an earlier R&R on my alternator, which was shortly after I bought the car, I found that the alternator housing had a crack. Is this related to upgraded bolt solution? I don’t know, but seems plausible, especially on an engine with a vibration signature such as a flat plane crank V-8. The spring used here is the same ones that are used on the exhaust clamps, just without the internal sleeve since the alternator uses an M10 bolt rather than the M8 on the exhaust, so there is really nothing special when it comes to the spring hardware.
more text